Thursday, 10 December 2015

Videogame Character Development - Animation Extension Task

As an extension task to this character development unit, I have been tasked with animating my character using Adobe's 'Mixamo' tool set, this is a very easy tool used for rigging a biped character and as such is very useful not only for this project, but may be useful for my own projects in the future also.

I started by assuring my character was exported as a .fbx file, with 'embed media' ticket to carry across both the normal and diffuse textures.

From here, I imported the .fbx into the Mixamo site and was presented with a rigging screen, here I placed markers for the chin, elbows, wrists, groin and knees of my character, upon confirmation of the placement I clicked next and the software proceeded to auto-rig my character.


Once rigged, I exported my character model once again in .fbx format ready for use in Maya, the model was imported with the auto-rigged skeleton attached.
To complete the rigging process and gain access to control points within Maya I needed to download and install a scripting tool, this meant loading and executing a python script within the script editor in Maya, making sure the Python tab was selected prior to import to avoid any import issues.


Once the script had been loaded and executed from the correct file path (documents\maya\scripts), the character was selected and the script was run, taking the data from my character's skeletal rig and transferring the data into a set of controls which I could use in software for animation.

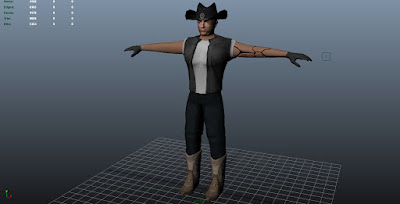
I began experimenting with the control options, changing the FK/IK values to allow myself control of the hands especially, but moving and rotating the control points as desired to position my character from a T-pose into an idle fighting pose.


I have currently posed my character in an idle fighting position, and will experiment further with animating my character in Maya, and update this blog for my own reference in due course.

Friday, 20 November 2015

Videogame Character Development - Summary

At this point, I am happy with my character model, I am aware there are ways I can improve upon the model, such as textures and UV layout, I will be looking to improve these aspects from this point on.
I laid out my UV's with one eye on my current mesh and one eye on additional pieces which had been cut, but could be added at a later date and as such, I have a few spaces in which the UV's could be expanded, allowing for more detail within my current mesh.

Looking at the poly count, this is also a factor which I would change through another development pipeline, I may start with a similar mesh but I would look to increase the level of detail throughout the model and in the face especially.
Having a poly budget of 44,000 Tris and clocking in my final textured piece at 8,088 Tris altogether works both for and against me. Against me in the sense that I have a huge percentage of my poly count remaining, and could improve the character exponentially by utilising the rest of it, whilst accounting for this I must also take into account the extra pieces I was intending to model, but did not get to.
This poly count also works in my favour in a sense that I now know I can work to a low poly budget and come out at the end with a character I am happy with, this could translate into future work, for example if I were to work on a character further down the line for a game on a platform with less capabilities therefore limiting my poly count drastically, I am fairly confident that I could limit my low poly modelling with relative ease and produce a worthy character.

I had originally intended for my character to have a cloak, a holster and a gun, these are all features which I have had to cut out due to time constraints.
I still intend on modelling a gun for my character, but have chosen to go for a less intricate design, regardless of whether or not I fit it in with the time I have remaining, I will be modelling a Winchester Model 1887 shotgun for my character, I was originally intending on modelling an intricately detailed revolver to go with him.

Any further progress I make with this character and the additional accessories will be documented here and the blog will be updated accordingly.

Video Render viewable HERE

Thursday, 19 November 2015

Videogame Character Development - Mudbox Tools

Through my introduction to mudbox in this unit I have been tasked with detailing 5 tools I have used and how I used them.

Sculpt Tool.

The Sculpt tool is quite possibly the most widely used tool in Mudbox as it is a sculpting software, either sculpting onto or taking away from the current mesh, allowing me to gain more definition in a feature on my character.
I used the Sculpt tool on every piece of geometry my character was to be made up of, for example to build shape and definition in the ears of my character, or to define the bionic arm belonging to my character.

Smooth tool.

I used the smooth tool a lot in the high poly sculpting process also, being used to smooth an area out which has been sculpted inward or outward. A specific example of this tool which I have used in this project is the stencilling in of the scar placed on the right of my character's face, running around the eye and down the cheek.
Due to the quality of the stencil detail surrounding the scar particularly, I needed to smooth the area either side of the scar tissue, not only so as to correct the mesh, but to give the scar itself more definition, to make it pop a little more.

Grab tool.

The grab tool does exactly what it says on the tin, grabbing a portion of the mesh, determined by the brush size. The grab allows the user to not only push and pull the mesh, but to more finely reshape certain features, within the head of my character I flared the nostrils a little as I felt they were too slim, and thinned the bridge of the nose slightly also, this allowed me to gain a facial shape I was more happy with on my character.

Projection tool.

Within the painting tools, is the projection tool, this allows the user to take a reference image and under the right file type, physically project it onto a surface using a brush, this is useful for gaining a realistic diffuse base for a detailed element, such as a pair of jeans or boots, this may have worked quite well for my boots, though my model varied from most reference photos and as such didn't fit well, I hand painted the boot and used projection techniques elsewhere within my model.

Pinch Tool.

The Pinch tool is very useful for adding definition to edges, as it is largely used for sharpening corners in a mesh, I used this, though it didn't have a huge effect on the mesh, on my Bionic Arm. I was looking to sharpen up the plated design, but the tool didn't do a very good job of the tightening.
This could be down to the sculpt I wished to sharpen being too large a job, I will almost certainly use this tool again somewhere further down the line.


Videogame Character Development - Baking

Once I had finished with the high poly modelling phase of my character's creation, I was ready to begin the process of transporting the sections back to Maya and begin the High to Low poly bake procedure.

I began by taking the boot, as I was most eager to see this in a state closer to finished. I exported the boot at subdivision level 5 back to Maya, made sure the meshes were in identical space and began the bake process.
I set the map size to 2048 as detailed in the brief, the detail level to 8x8 (High), set the file type to PSD so as I would have a master document to make any edits from in PhotoShop and started the physical bake itself, As the diffuse channel was sent across with the mesh from Mudbox, I chose to bake both the Normal map and Diffuse map at the same time.

The result of my first two bakes and the impact this had on the 3D mesh can be seen below.


I am reasonably happy with how my boot turned out, there is quite an evident bump shown on the boot from the normal map and the diffuse displays as I had hoped it would. These together brought the boot to a point at which I was happy enough with the boot to move onto another section of the character.

I moved onto the face from here, knowing that there was slightly more work to be done than with the boot as I had needed to use two separate heads, one for high poly sculpt and one for the paint.

I began by bringing the high poly, sculpted head into Maya and baking that down, again with the same settings as before, (2048 map size and 8x8 quality), also keeping to the PSD file types so they could be easily re-saved as a Targa, and also for editing purposes if necessary post-bake. 

I ran into one very slight issue when baking the normal for the head, as the eye sockets had overlapped somewhat and the normal map was displaying a little distortion in the area of the lower eyelid. This was the reason for each bake being pre-emptively primarily produced in the PSD file format.

I imported the PSD into PhotoShop and made some minor manual alterations to the bake using the brush and clone stamp tool and once finished, saved the PSD with it's now multiple layers, then exported as a Targa to be used within Maya.

The manually altered bake result can be seen below.


I followed this by bringing in the second head for baking, the head I had painted onto for diffuse purposes. Following the standard bake procedure I produced the diffuse map, the result can once again be seen below.


As can be seen on the diffuse map, the hair of my character does not cover the entire head. The reason behind this is that the hat is intended to always be on, and as such the entirety of the head does not need to be painted.

Having reached a point at which I felt that within the time I had left, I was not going to be able to add many more blatant improvements to the head, I once again moved onto another section of my model, choosing the Torso as my next point of call.

The torso of my character was very simple in design, with a white t-shirt and a leather vest over the top. I was initially intending on the vest to be a tan shade of brown leather, however at the point of painting, decided that a simple black leather vest would suit my character better.
As there was not much detail in the surface of the vest itself this was a fairly simple bake process, with the only main detail being in the read of the vest, a Bull's skull which I had previously stencilled into the vest in the High Poly creation stage.

Following the same guidelines and format requirements I produced another simultaneous normal/diffuse bake for the Torso, and results can be seen below.


Again taking time constraints into account, though the t-shirt could have used some detail in terms of the material, I was not completely sure if this would show very well, accounting for the amount of space I had assigned the torso on the Texture Sheet. With this in mind, I was happy enough with my torso to move onto another piece of my mesh. I chose to move onto the character left arm, the bionic arm from the conceptual design.

The arm was another relatively simple bake, due to the shape and proportions it made for an easy bake in comparison to the head for example, which I had previously had minor issues with. The arm bake was issue free and through following the same methods as before, I produced a dual bake once more for the Normal and Diffuse material channels.

I may have made slight manual alterations to the bake itself had I had more time for this project to tighten up the edges on the bionic plating but from a time management perspective and also a texture space angle, I decided to not make the alterations. This decision was made as firstly, I was happy enough with the bake itself to move on, second, I did not feel the higher level of detail would necessarily show in the texture as the allotted space was not all that large and lastly, the alterations may have taken up considerable time for such an element of my character, and I must manage my time accordingly to have this project complete on time.

The result of both the Normal and Diffuse bakes for the arm can be seen below.


I progressed through the rest of my normal and diffuse bakes for each respective piece of the character, and then needed to combine them all together into two 2048 texture sheets, one for the normal detailing, and one for the diffuse respectively. This again is a reason for which I am happy I had pre-emptively saved each bake out as a PSD.

For the Diffuse bake, I began selecting the black background layer on pieces which I could, using the magic wand at a high strictness and then selected the inverse portion, that being the physical textures, I then took the texture and planted it into a new layer on a fresh document. For any textures I had produced which contained black, I utilised the lasso and polygonal lasso tools to select each bake, then transplanted them from their respective documents onto the full bake document.

For the Normal bake, the polygonal lasso tool was used for almost the entirety of the transplant, cutting each bake from their respective PSD and putting them in place within the full bake file.
I made sure through both the diffuse and the normal that the pieces were in exactly the same places when pasted in to still fit in accordance with the model UVs.

The full bakes in their entirety and the mesh post-bake can be seen below.


Sunday, 15 November 2015

Videogame Character Development - Painting


After finishing up with the high poly modelling within mudbox, I began painting each piece of geometry, ready to be baked down into a specular map along with the normal maps which would come from the baking of the geometrical values from the high poly meshes themselves.

I began the painting process with the part of my character I was most eager to paint, the boot.

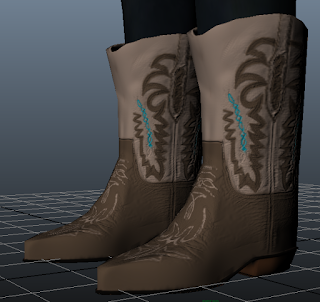
I started with a base layer of brown, a brown that would be commonly found on a boot and built on top of it with multiple layers including Black and an alternate brown for the sole, cream/beige for the upper of the boot itself and another layer or the initial brown, the beige and a blue, each used for respective sections of trim on the boot.

I used a mix of the airbrush, standard brush and pencil tools for painting the boot, ranging in use from the base coats to the finer details.
Below are screen captures or each layer following their respective pain processes.


Possibly one of the more simple to paint, yet intricate pieces of my character was the bionic arm, whilst the mesh itself was more intricate in comparison to the other arm. As a result this mesh only needed two layers of pain, one for the skin tone base layer and a layer of black for the gaps in between bionic plates.

To represent the skin tone I sourced a high resolution image of skin online, modified the file type in order to use it in Mudbox as a projection stencil, then used the projection tool to paint the skin tone onto the arm.


To follow the base coat I applied a coat of a fully opaque black to the grooves in the arm, this was done to make the 'plates' pop more substantially and to give it an overall more bionic look.


Possibly the most complex part of the model to paint is the head, and due to the issues I had encountered through my own doing earlier in the production process, I encountered another stumbling block here.
I could not simply paint onto the head as I had lost the UV values upon cutting the high poly head in half, to mirror the sculpted ear early in the high poly process, I therefore could not transport this model back into Mudbox as I would have liked and had to find another method to paint the head.
Taking this issue into account, I baked the Higher polygonal head onto the low mesh and exported the low poly head from Maya to Mudbox, keeping the normal maps assigned to the head, this gave me a platform to paint on which had a reasonable level of detail in the surface, enough to paint on top of with more ease.

Upon importing the low poly head with the normal map applied into mudbox, I increased the subdivision level as I did previously to begin the high poly creation, but this time to provide myself with a smoother surface to paint onto. 
I started on the face with a simple skin tone projection, much like the arm. I then concentrated on the facial features, the projection tool allowed me to paint on eyebrows and lips specifically with relative ease, as I felt it hard to attain a realistic looking eyebrow with simply brushes and pencil tools.
I also applied a layer of hair around the head, though not all the way over the head as my character has a hat, this will be staying on and his head will not be exposed.
After I had finished the painting of the face on the low poly head, I removed the normal map layer so to avoid any clashing issues that a potential double normal bake may cause and sent it back to Maya.

Whilst the projection tool has helped with various painting elements in my character, I will be looking to improve my anatomical study in time to come, improving not only my modelling but also my texturing in the process.

My finished low poly painted head can be seen below.


Videogame Character Development - High poly creation.

Once I had the low polygonal mesh at a point which I was happy with, I began the process of transporting the meshes into Mudbox one at a time for the creation and manipulation of higher poly pieces.

I began with the head, taking the low mesh, sending it to Mudbox as a new scene and increasing the subdivision level to 5, to give myself a highly enough detailed mesh to sculpt in some facial features.
Using mainly the Sculpt, Wax, Flatten and Smooth tools I set about sculpting in details on the high polygonal mesh which would resemble a more realistic facial representation.

I also used a stencil for the facial scar my character has, and another for the lips, in an attempt to achieve a realistic looking surface bump. Combined with the tools, the stencils proved to be a useful tool for development.

I also used the grab tool to reshape my characters nose, as the bridge of the nose was very wide to begin with, making it slimmer.

The smaller details, such as the nostril detail and the definition to the chin were sculpted inward by holding CTRL whilst using the sculpt tool.


One piece of the character I was hoping to make look particularly good was the boot, as cowboy boot detailing can be somewhat tricky, I decided to again use stencils and sculpt into the surface via the stencil.

The placement of the stencil itself was somewhat tricky and needed to positions just right to make the pattern work with the shape of my boot.

I used one stencil for the pattern on the side of the boot, and a separate stencil for pattern on the upper of the toe. Using a low strength and a reasonable brush size I built the pattern onto the surface of the boot using the sculpt tool.


I didn't run into many problems whilst modelling the higher poly meshes as a whole, though whilst working on the head, I finished the ear only to find I was working without the geometry being mirrored.
Whilst there may have been other ways to rectify this, I took the head back into Maya, removed the half of the head which had not been sculpted into, mirrored the geometry in Maya and sewed together the halves, making use of Maya 2016's merge threshold for extra accuracy, as Maya 2015 was grouping multiple vertices around one point, a result which was not desirable for further work within Mudbox.

Another issue I faced within high poly creation, was the breaking of UV's within my high poly boot, the original high poly mesh corrupted and could not be read by Mudbox, this meant re-exporting the high poly mesh to Mudbox from Maya.
Upon importing the model back into Mudbox, I was confronted with an apparent lack of US and as such could not paint the model, this resulted in a re-sculpt of the high poly, after transporting the low poly into Mudbox once again. Luckily this issue didn't hold me back for long and I had a fresh high poly boot sculpted and was ready to paint not long after.

Possibly the most difficult part of my high poly modelling was to be my Bionic arm. Whilst I had a vision in my head of what I wanted the arm to look like, I was not quite sure how to go about making it a reality. I used a stencil but initially the arm didn't look right, and so I left the arm to be returned to at a later time.

When I came back to sculpting the arm I had a little more idea of how I wanted to go about the sculpt, how I wanted the arm to appear, and utilising an image from one of my design boards in the concepting stage, was able to make an effective stencil and build on the arm as desired.
The final piece did not come out 100% as I had planned, but I was still happy with how the arm came out in the sculpt itself.


Having edited each piece of low polygonal mesh in Mudbox, including the other arm, both hands and the legs, the stage felt complete, I rounded off this stage of the character creation. This allowed me to begin the poly painting process.

Videogame Character Development - Creating the extras.

As I had concepted a character which featured a cowboy hat and boots, I needed to create these additional meshes within Maya, as they were to be important additional factors to my characters look.

I began modelling the hat by using a cylinder, making use of many subdivisions and lots of vertices to manipulate the hat into a desirable shape, making sure to model the hat as a similar scale to the head so as it would fit onto the head with relative ease.
I selected rings of vertices and used the mainly the scale and translate tools to modify their positions.


I also needed to model a boot for my character, and tried two different methods before I got a boot I was happy with, as the first did not yield desirable results.

I started with a base cube, inserted a couple of extra edge loops and extruded a face to create the lip of the sole, from here I created the heel and built upward on the cube to create a boot which I was happy with, and from here I could progress forward.


I needed to UV these meshes also, in accordance with the other geometry my character is comprised of, I repeated the same methods as before, splitting the UVs on one side of the model in order to unwrap it neatly.

Once both the boot and the hat were unwrapped, I used the remaining space within my texture sheet to allocate them a place at the bottom and top right respectively.


From this point I was able to begin the development of my high poly meshes within Mudbox.