I began by taking the boot, as I was most eager to see this in a state closer to finished. I exported the boot at subdivision level 5 back to Maya, made sure the meshes were in identical space and began the bake process.
I set the map size to 2048 as detailed in the brief, the detail level to 8x8 (High), set the file type to PSD so as I would have a master document to make any edits from in PhotoShop and started the physical bake itself, As the diffuse channel was sent across with the mesh from Mudbox, I chose to bake both the Normal map and Diffuse map at the same time.
The result of my first two bakes and the impact this had on the 3D mesh can be seen below.


I am reasonably happy with how my boot turned out, there is quite an evident bump shown on the boot from the normal map and the diffuse displays as I had hoped it would. These together brought the boot to a point at which I was happy enough with the boot to move onto another section of the character.
I moved onto the face from here, knowing that there was slightly more work to be done than with the boot as I had needed to use two separate heads, one for high poly sculpt and one for the paint.
I began by bringing the high poly, sculpted head into Maya and baking that down, again with the same settings as before, (2048 map size and 8x8 quality), also keeping to the PSD file types so they could be easily re-saved as a Targa, and also for editing purposes if necessary post-bake.
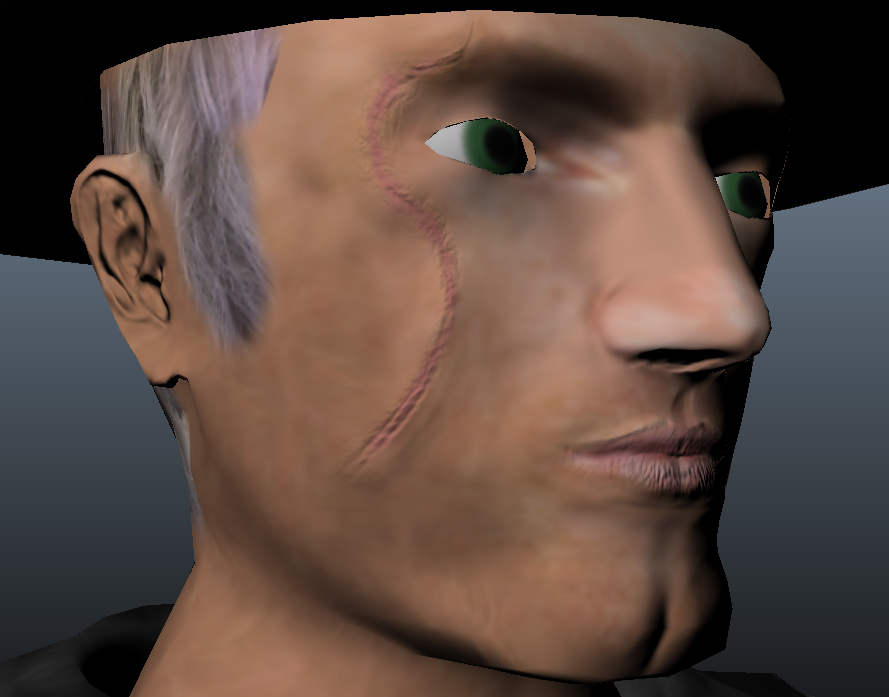
I ran into one very slight issue when baking the normal for the head, as the eye sockets had overlapped somewhat and the normal map was displaying a little distortion in the area of the lower eyelid. This was the reason for each bake being pre-emptively primarily produced in the PSD file format.
I imported the PSD into PhotoShop and made some minor manual alterations to the bake using the brush and clone stamp tool and once finished, saved the PSD with it's now multiple layers, then exported as a Targa to be used within Maya.
The manually altered bake result can be seen below.


I followed this by bringing in the second head for baking, the head I had painted onto for diffuse purposes. Following the standard bake procedure I produced the diffuse map, the result can once again be seen below.

As can be seen on the diffuse map, the hair of my character does not cover the entire head. The reason behind this is that the hat is intended to always be on, and as such the entirety of the head does not need to be painted.
Having reached a point at which I felt that within the time I had left, I was not going to be able to add many more blatant improvements to the head, I once again moved onto another section of my model, choosing the Torso as my next point of call.
The torso of my character was very simple in design, with a white t-shirt and a leather vest over the top. I was initially intending on the vest to be a tan shade of brown leather, however at the point of painting, decided that a simple black leather vest would suit my character better.
As there was not much detail in the surface of the vest itself this was a fairly simple bake process, with the only main detail being in the read of the vest, a Bull's skull which I had previously stencilled into the vest in the High Poly creation stage.
Following the same guidelines and format requirements I produced another simultaneous normal/diffuse bake for the Torso, and results can be seen below.


Again taking time constraints into account, though the t-shirt could have used some detail in terms of the material, I was not completely sure if this would show very well, accounting for the amount of space I had assigned the torso on the Texture Sheet. With this in mind, I was happy enough with my torso to move onto another piece of my mesh. I chose to move onto the character left arm, the bionic arm from the conceptual design.
The arm was another relatively simple bake, due to the shape and proportions it made for an easy bake in comparison to the head for example, which I had previously had minor issues with. The arm bake was issue free and through following the same methods as before, I produced a dual bake once more for the Normal and Diffuse material channels.
I may have made slight manual alterations to the bake itself had I had more time for this project to tighten up the edges on the bionic plating but from a time management perspective and also a texture space angle, I decided to not make the alterations. This decision was made as firstly, I was happy enough with the bake itself to move on, second, I did not feel the higher level of detail would necessarily show in the texture as the allotted space was not all that large and lastly, the alterations may have taken up considerable time for such an element of my character, and I must manage my time accordingly to have this project complete on time.
The result of both the Normal and Diffuse bakes for the arm can be seen below.


I progressed through the rest of my normal and diffuse bakes for each respective piece of the character, and then needed to combine them all together into two 2048 texture sheets, one for the normal detailing, and one for the diffuse respectively. This again is a reason for which I am happy I had pre-emptively saved each bake out as a PSD.
For the Diffuse bake, I began selecting the black background layer on pieces which I could, using the magic wand at a high strictness and then selected the inverse portion, that being the physical textures, I then took the texture and planted it into a new layer on a fresh document. For any textures I had produced which contained black, I utilised the lasso and polygonal lasso tools to select each bake, then transplanted them from their respective documents onto the full bake document.
For the Normal bake, the polygonal lasso tool was used for almost the entirety of the transplant, cutting each bake from their respective PSD and putting them in place within the full bake file.
I made sure through both the diffuse and the normal that the pieces were in exactly the same places when pasted in to still fit in accordance with the model UVs.
The full bakes in their entirety and the mesh post-bake can be seen below.


No comments:
Post a Comment